Monday, 8 September 2014

Program to Reverse a Number in Java


Reverse a Number :

Since every digit when divided by 10 gives the remainder equal to the unit place digit of that number and we need to set that unit place digit of number to the last place digit of the number than again set the 100’s digit of that number to the second last place of the given number and so on.

To get the remainder of a number, a modulus (%) operator is used in the program. The program is shown below :

 import java.util.Scanner;  
   
 class ReverseNumber  
 {  
      public static void main(String[] args)  
      {  
           Scanner scan = new Scanner(System.in);  
   
           //scan for the number  
           System.out.println("Enter the number you want to reverse");  
           int n = scan.nextInt();  
   
           //initialize a variable to zero in which we will store reverse no.  
           int reverse = 0;  
   
           //make a while loop till the number will zero  
           while(n != 0)  
           {  
                //first multiply the reverse no. with 10 to shift its digit to next place  
                reverse = reverse * 10;  
                //add the remainder of number/10 to the reverse no.  
                reverse = reverse + n%10;  
                  
                //divide the number by 10 to reduce its one place  
                n = n/10;  
   
                //if n==0 than exit from the loop else repeat  
           }  
   
           //print the reverse number  
           System.out.println("The reverse number is "+reverse);  
      }  
 }  
Output :


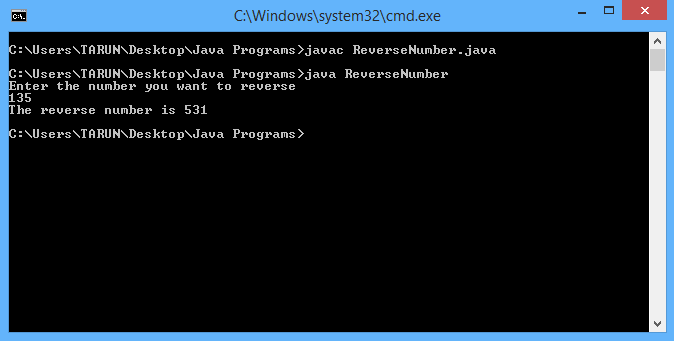
In this program we repeatedly find the remainder or unit digit of number by modulus operation with 10 and than reduce the digits by dividing  the number with 10  to get the next unit digit of the given number.
Read more

Auto Complete Text View Tutorial in Android


Auto Complete Text View :


In Auto Complete Text View whenever we start writing a text in the Edit View than it will automatically show the available options related to that text as you stored in an array or in a database. You can see the example shown in the following screenshot :

In this example, I am storing the available options in the array and than just set the adapter for simple dropdown list available in android environment with that list.

To make this type of application you need to use the AutoCompleteTextView class available in android environment rather than simple TextView or EditView.

Let’s start coding by creating a project in Eclipse : File => New => Android Application Project and give a package name as com.javalanguageprogramming.autocompletetextdemo.

Copy the code for activity_main.xml as shown below :

   
 <LinearLayout xmlns:android="http://schemas.android.com/apk/res/android"  
   xmlns:tools="http://schemas.android.com/tools"  
   android:layout_width="match_parent"  
   android:layout_height="match_parent"  
   >  
   
   <AutoCompleteTextView  
     android:id="@+id/autoText"  
     android:layout_width="220dp"  
     android:layout_height="50dp"  
     android:layout_marginLeft="40dp"  
     android:layout_marginTop="50dp"  
     />  
   
 </LinearLayout>  


In this xml file I am using AutoCompleteTextView for completing of text automatically from String array.

Now consider the code for Main.java as shown below :

 package com.javalanguageprogramming.autocompletetextdemo;  
   
 import android.app.Activity;  
 import android.os.Bundle;  
 import android.widget.ArrayAdapter;  
 import android.widget.AutoCompleteTextView;  
   
   
 public class MainActivity extends Activity {  
   
      AutoCompleteTextView autoText;  
      @Override  
      protected void onCreate(Bundle savedInstanceState) {  
           super.onCreate(savedInstanceState);  
           setContentView(R.layout.activity_main);  
             
           //initialize auto complete text view  
           autoText = (AutoCompleteTextView)findViewById(R.id.autoText);  
             
           //make an array for the suggestions  
           String[] suggest = {"aa", "all", "auto", "ask", "bb", "bat", "bad", "back", "ball", "cat", "java", "Program", "tutorial"};  
             
           //make an array adapter for viewing string array  
           ArrayAdapter<String> adapter = new ArrayAdapter<String>(MainActivity.this, android.R.layout.simple_dropdown_item_1line, suggest);  
             
           //set the adapter to the auto complete text view  
           autoText.setAdapter(adapter);  
      }  
 }  


In this Activity, a String array named as “suggest” is used to provide the available options and ArrayAdapter for providing the views to the drop down list.
Read more

Sunday, 7 September 2014

Matrix Multiplication Program in Java


Matrix Multiplication Program :


To multiply two matrices we need to first check whether the two matrices can be multiplied or not. For that compare the first matrix column with the rows of second matrix, if they are equal than only the two matrices can be multiplied with each other.

For example :

Let the first matrix be of the order 3X3 and second matrix be of the order of 3X2. Since both the no. of columns in first matrix and no. of rows in second matrix are equal i.e. 3, the two matrices can be multiplied with each other and the resultant matrix will be of the order 3X2 (rows in first matrix and columns in second matrix).

In general,
M(ixj) * M(jxk) = M(ixk)

To multiply the two matrices we need to multiply the rows of first matrix to the columns of second matrix as shown below in the diagram.


Now let’s consider the program of matrix multiplication in which the two matrices are multiplied with the use of three nested loops.

 import java.util.Scanner;  
   
 class MatrixMulDemo  
 {  
      public static void main(String[] args)  
      {  
           //make a scanner for rows and columns  
           Scanner scan = new Scanner(System.in);  
   
           System.out.println("Enter the number of rows for first matrix");  
   
           //store rows in a variable  
           int rowsFirst = scan.nextInt();  
           System.out.println("Enter the number of columns for first matrix / rows of   
   
 second matrix (they must be same for matrix multiplication");  
             
           //store columns in a variable  
           int colFirstRowSec = scan.nextInt();  
   
           System.out.println("Enter the columns for second matrix");  
           //store columns of second matrix in a variable  
           int colSec = scan.nextInt();  
   
           //make two dimensional arrays for storing the matrices elements  
   
           int[][] first = new int[rowsFirst][colFirstRowSec];  
           int[][] second = new int[colFirstRowSec][colSec];  
   
           System.out.println("Enter the values of first matrix");  
           for(int i=0; i<first.length; i++)  
           {  
                for(int j=0; j<first[0].length; j++)  
                {  
                     first[i][j] = scan.nextInt();  
                }  
           }  
   
           System.out.println("Enter the values of second matrix");  
           for(int i=0; i<second.length; i++)  
           {  
                for(int j=0; j<second[0].length; j++)  
                {  
                     second[i][j] = scan.nextInt();  
                }  
           }  
   
           //define the third resultant matrix  
           int result[][] = new int[rowsFirst][colSec];  
   
           //multiply the two matrices using three nested loops  
           for(int i=0; i<rowsFirst; i++)  
           {  
                for(int j=0; j<colSec; j++)  
                {  
                     for(int k=0; k<colFirstRowSec; k++)  
                     {  
                          result[i][j] = result[i][j] + first[i][k] * second  
   
 [k][j];  
                     }  
                }  
           }  
   
           //print all the elements of result matrix  
           System.out.println("Product of two matrices ");  
           for(int i=0; i<result.length; i++)  
           {  
                for(int j=0; j<result[0].length; j++)  
                {  
                     System.out.print(result[i][j] + " ");  
                }  
                //for line gap  
                System.out.println();  
           }  
      }  
 }  

Output :

Read more

Transfer data from one Activity to Another Activity in Android


Transfer data with Intents :


We can easily transfer data from one activity to another activity with the use of Intents in Android Application. In this example I am sending the name (set in edit text) from one activity and will use that name in another activity.


Create a new project in Eclipse : File => New => Android Application Project and give the package name as com.javalanguageprogramming.datatransferfromactivitydemo.

Copy the code in activity_main.xml shown below :


 <LinearLayout xmlns:android="http://schemas.android.com/apk/res/android"  
   xmlns:tools="http://schemas.android.com/tools"  
   android:layout_width="match_parent"  
   android:layout_height="match_parent"  
   android:orientation="vertical"  
   android:background="#ced3e2"  
    >  
   
   <LinearLayout  
     android:layout_width="wrap_content"  
     android:layout_height="wrap_content"  
     android:orientation="horizontal" >  
   
     <TextView  
       android:layout_width="wrap_content"  
       android:layout_height="wrap_content"  
       android:layout_marginLeft="20dp"  
       android:layout_marginTop="10dp"  
       android:text="Your Name"  
       android:textSize="18sp" />  
   
     <EditText  
       android:id="@+id/nameEdit"  
       android:layout_width="180dp"  
       android:layout_height="40dp"  
       android:layout_marginLeft="20dp"  
       android:layout_marginTop="10dp" />  
   </LinearLayout>  
   
   <Button  
     android:id="@+id/sendButton"  
     android:layout_width="100dp"  
     android:layout_height="wrap_content"  
     android:layout_gravity="center"  
     android:layout_marginTop="10dp"  
     android:text="Send" />  
   
 </LinearLayout>  

In the above xml file a text view is used to give the label “your name” and edit text is used for entering the name and a button is used to send the name to another activity.

Copy the code in activity_receive_data.xml shown below :

 <?xml version="1.0" encoding="utf-8"?>  
   
 <LinearLayout xmlns:android="http://schemas.android.com/apk/res/android"  
   android:layout_width="match_parent"  
   android:layout_height="match_parent"  
   android:orientation="vertical"  
   android:background="#ced3e2"  
    >  
   
   <TextView  
     android:layout_width="wrap_content"  
     android:layout_height="wrap_content"  
     android:layout_gravity="center"  
     android:layout_marginTop="30dp"  
     android:gravity="center"  
     android:text="Hey!"  
     android:textSize="23sp" />  
   
   <TextView  
     android:id="@+id/nameText"  
     android:layout_width="wrap_content"  
     android:layout_height="wrap_content"  
     android:layout_gravity="center"  
     android:layout_marginTop="10dp"  
     android:gravity="center"  
     android:textSize="25sp"  
     android:textStyle="bold" />  
   
   <TextView  
     android:layout_width="wrap_content"  
     android:layout_height="wrap_content"  
     android:layout_gravity="center"  
     android:layout_marginTop="10dp"  
     android:gravity="center"  
     android:text="Welcome to"  
     android:textSize="23sp" />  
   
   <TextView  
     android:layout_width="wrap_content"  
     android:layout_height="wrap_content"  
     android:layout_gravity="center"  
     android:layout_marginTop="10dp"  
     android:gravity="center"  
     android:text="http://javalanguageprogramming.blogspot.in"  
     android:textSize="20sp" />  
   
 </LinearLayout>  


In the above code 4 text views are used, out of one is used for the name which is coming from MainActivity.

Copy the code in MainActivity.java shown below :

 package com.javalanguageprogramming.datatransferfromactivitydemo;  
   
 import android.app.Activity;  
 import android.content.Intent;  
 import android.os.Bundle;  
 import android.view.View;  
 import android.view.View.OnClickListener;  
 import android.widget.Button;  
 import android.widget.EditText;  
   
   
 public class MainActivity extends Activity {  
   
      EditText name;  
      Button send;  
        
      @Override  
      protected void onCreate(Bundle savedInstanceState) {  
           super.onCreate(savedInstanceState);  
           setContentView(R.layout.activity_main);  
             
           //initialize variables  
           name = (EditText)findViewById(R.id.nameEdit);  
           send = (Button)findViewById(R.id.sendButton);  
             
           //set on click listener on button  
           send.setOnClickListener(new OnClickListener() {  
                  
                @Override  
                public void onClick(View v) {  
                     // check if the edit text is empty or not  
                     if(name.getText() != null || !name.getText().equals("")){  
                          //make an intent  
                          Intent intent = new Intent(MainActivity.this, ReceiveDataActivity.class);  
                          //put data in intent  
                          intent.putExtra("NAME", name.getText().toString());  
                          //clear the edit text so that after user come back he will again enter text  
                          name.setText("");  
                          //start another activity  
                          startActivity(intent);  
                     }  
                }  
           });  
      }  
 }  


In this activity, putExtra method of Intent type is used to send the data from this activity to another activity.

Copy the code of ReceiveDataActivity.java shown below :

 package com.javalanguageprogramming.datatransferfromactivitydemo;  
   
 import android.app.Activity;  
 import android.content.Intent;  
 import android.os.Bundle;  
 import android.widget.TextView;  
   
   
 public class ReceiveDataActivity extends Activity{  
   
      TextView nameText;  
      @Override  
      protected void onCreate(Bundle savedInstanceState) {  
           // TODO Auto-generated method stub  
           super.onCreate(savedInstanceState);  
           setContentView(R.layout.activity_receive_data);  
             
           //initialize text view  
           nameText = (TextView)findViewById(R.id.nameText);  
             
           //get the intent  
           Intent intent = getIntent();  
           //get the name with the use of intent  
           String name = intent.getStringExtra("NAME");  
             
           //set the text view  
           nameText.setText(name);  
      }  
   
 }  


In this activity, getStringExtra method of intent type is used to receive data in this activity that came from previous activity.

Do not forget to add ReceiveDataActivity in AndroidManifest. The code of AndroidManifest is shown below :

 <?xml version="1.0" encoding="utf-8"?>  
   
 <manifest xmlns:android="http://schemas.android.com/apk/res/android"  
   package="com.javalanguageprogramming.datatransferfromactivitydemo"  
   android:versionCode="1"  
   android:versionName="1.0" >  
   
   <uses-sdk  
     android:minSdkVersion="8"  
     android:targetSdkVersion="19" />  
   
   <application  
     android:allowBackup="true"  
     android:icon="@drawable/ic_launcher"  
     android:label="@string/app_name"  
     android:theme="@style/AppTheme" >  
     <activity  
       android:name="com.javalanguageprogramming.datatransferfromactivitydemo.MainActivity"  
       android:label="@string/app_name" >  
       <intent-filter>  
         <action android:name="android.intent.action.MAIN" />  
   
         <category android:name="android.intent.category.LAUNCHER" />  
       </intent-filter>  
     </activity>  
     <activity  
       android:name="com.javalanguageprogramming.datatransferfromactivitydemo.ReceiveDataActivity"  
       android:label="@string/app_name" >  
         
     </activity>  
   </application>  
   
 </manifest>  
   

Read more

Friday, 5 September 2014

Inheritance in Java


DEFINITION OF INHERITANCE :

Inheritance is one of the cornerstones of Object Oriented Programming (OOP) which means to inherit the properties of one class and extends according to the need. The two keywords used in inheritance are extends (for class) and implements (for interface).

Inheritance allows the creation of hierarchical classifications. In inheritance a general class is used to define the common methods and variables that can be used in other class. The class which inherits the general class will get all the public methods and variables present in the general class. Now, general class is called super class or base class and the class which inherits its properties is knows as sub class or child class.

To understand the concept of inheritance, consider an example :

Suppose you want to calculate the area of a square, a rectangle, a circle having same radius as length of square than by using the same length available in the base class Shape you can easily extends that class to Square class or rectangle class or circle class by the use of extends keyword.

 class Shape  
 {  
      //define a length which is public and can be used in square,   
      //rectangle and circle classes  
      public int length = 10;  
 }  
   
 //inherit the properties of Shape class with the use of extends keyword  
   
 class Square extends Shape  
 {  
      void area()  
      {  
           //calculate area of square  
           int area = length * length;  
   
           //print it on the screen  
           System.out.println("Area of square : "+area);  
      }  
 }  
   
 class Rectangle extends Shape  
 {  
      void area()  
      {  
           //define a breadth  
           int breadth = 7;  
           //calculate area of rectangle  
           int area = length * breadth;  
           //print on the screen  
           System.out.println("Area of rectangle : "+area);  
      }  
 }  
   
 class Circle extends Shape  
 {  
      void area()  
      {  
           //calculate area of circle using length of the shape class as radius  
           float area = 3.14f * length * length;  
           //print on the screen  
           System.out.println("Area of circle : "+area);  
      }  
 }  
   
 //make a entry class which contains main method  
 class InheritanceDemo  
 {  
      public static void main(String[] args)  
      {  
           //object of child class square  
           Square sq = new Square();  
           //object of child class rectangle  
           Rectangle rec = new Rectangle();  
           //object of child class circle  
           Circle cir = new Circle();  
             
           //call the area methods of all child class to   
           //get the area of different objects  
           sq.area();  
           rec.area();  
           cir.area();  
      }  
 }  

Output :


Why we use Inheritance?

Inheritance is used because it provides the Reusability of the code like in the above example we used the same length from the Shape class thrice in different three classes.

Types of Inheritance in Java :

There are three general types of inheritance in java. These are :

1.  Simple Inheritance : In simple inheritance there is one base class and a single child class which extends the properties of base class.

     2. Multilevel Inheritance : In multilevel inheritance there is single parent and a child class and a further sub child class which inherit properties of child class.

Hierarchical Inheritance : In this type of inheritance many child classes inherit the properties of the same child class like the example used in this blog post.


Note : Multiple Inheritance in which a class inherits properties of more than one class is not present in Java to remove the ambiguity in the code.

Read more

Thursday, 4 September 2014

Alert Dialog Tutorial in Android


Alert Dialog :


Alert Dialog is used to display a pop up or dialog in the Activity. It is generally used to ask question from a user with the help of popup dialog at certain event.


Creating an Alert Dialog is very easy in Android with the use of AlertDialog class.

Create a new project in Eclipse : File => New => Android Application Project and give a package name as com.javalanguageprogramming.alertdialogdemo.

Copy the code of activity_main.xml file as shown below :

 <LinearLayout xmlns:android="http://schemas.android.com/apk/res/android"  
   xmlns:tools="http://schemas.android.com/tools"  
   android:layout_width="fill_parent"  
   android:layout_height="fill_parent"  
   >  
   
   <Button  
     android:id="@+id/alertButton"  
     android:layout_width="200dp"  
     android:layout_height="wrap_content"  
     android:text="Get Alert Dialog"   
     android:layout_gravity="center"  
     android:layout_marginLeft="50dp"  
     />  
   
 </LinearLayout>  


In this file we are creating a button which show a dialog when clicked and ask from user that you want to exit from application or not.

Copy the code of MainActivity.java as shown below :

 package com.javalanguageprogramming.alertdialogdemo;  
   
 import android.app.Activity;  
 import android.app.AlertDialog;  
 import android.app.AlertDialog.Builder;  
 import android.content.DialogInterface;  
 import android.content.DialogInterface.OnClickListener;  
 import android.os.Bundle;  
 import android.view.View;  
 import android.widget.Button;  
 import android.widget.Toast;  
   
   
 public class MainActivity extends Activity {  
   
      Button alertButton;  
      Builder dialog;  
   
      @Override  
      protected void onCreate(Bundle savedInstanceState) {  
           super.onCreate(savedInstanceState);  
           setContentView(R.layout.activity_main);  
   
           // initialize button variable  
           alertButton = (Button) findViewById(R.id.alertButton);  
   
           // initialize alert dialog  
           dialog = new AlertDialog.Builder(MainActivity.this);  
             
           //if button is clicked than set the alert dialog.  
           alertButton.setOnClickListener(new View.OnClickListener() {  
                  
                @Override  
                public void onClick(View v) {  
                     // call the alertDialogSetup method when button is clicked  
                     alertDialogSetup();  
                       
                }  
           });  
   
      }  
   
      private void alertDialogSetup() {  
           // set a title  
           dialog.setTitle("Exit Application");  
   
           // set a message  
           dialog.setMessage("Are you sure?");  
   
           // set positive button with OnClickListener for positive response  
           dialog.setPositiveButton("Yes", new OnClickListener() {  
   
                @Override  
                public void onClick(DialogInterface dialog, int which) {  
                     // Exit application when user click on yes  
                     System.exit(0);  
   
                }  
           });  
             
           // set negative button with OnClickListener for negative response  
           dialog.setNegativeButton("NO", new OnClickListener() {  
                  
                @Override  
                public void onClick(DialogInterface dialog, int which) {  
                     //cancel the dialog on negative button with the use of DialogInterface reference  
                     dialog.cancel();  
                       
                }  
           });  
             
           //there is one more button in alert dialog in the center called neutral button  
           dialog.setNeutralButton("Neutral", new OnClickListener() {  
                  
                @Override  
                public void onClick(DialogInterface dialog, int which) {  
                     // make a toast that neutral button is clicked  
                     Toast.makeText(MainActivity.this, "Neutral button is clicked", Toast.LENGTH_LONG).show();  
                       
                }  
           });  
             
           //you can use image with the text in the dialog  
           dialog.setIcon(R.drawable.ic_launcher);  
             
           // Now show the dialog on the activity  
           dialog.show();  
      }  
 }  


In this Activity, we are creating three buttons (Positive => Yes, Negative => No, Neutral => Cancel) in the dialog. You can create single button or two buttons dialog.
Read more

Wednesday, 3 September 2014

Concept of Encapsulation in Java


Concept of Encapsulation in Java :

Encapsulation is one of the Object Oriented Programming fundamental means wrapping (encapsulating) up of data or fields in a single method, make each field private (access specifier) and give the access of method to users (by making the method public) and in this way we can save each field from outside world.

If we provide each single data to outside world than anyone can change its values which will result in breaching of security.

Encapsulation is sometimes called Data Hiding that means we hide single field and provide the method to user for accessing that data or field.

To understand encapsulation see the diagram shown below :


Why we need Encapsulation :

Encapsulation is needed to restrict the access of raw data to outside world. To understand this statement, let’s take an example :

Suppose I have a bank account which is maintained on a software system and if I want to do a transaction than I can directly access all the variables relating to the account.

Let’s say there is a field, myBalance of integer type which is public. Now I can change or access its value by the object of Account class.

Now, consider the case when I withdraw some cash from my account, say 500 than I have to change the value of myBalance by decreasing the amount by 500 by this statement :

 obj.myBalance = myBalance – 500;  
 // where obj is an object of type Account.  


If I can directly access this variable than rather subtracting this amount, I can add double of that amount to myBalance or even add any balance that I want by the use of below statement :

 obj.myBalance = myBalance + 1000;  


That means I can freely change my balance which results in big loss to banks and here the concept of Encapsulation comes into the picture.

Through the use of encapsulation we can provide debit method to user and credit method to user for withdrawing cash and crediting cash respectively in account and also make the variable myBalance private.

For e.g.

 private int myBalance;  
   
 public int debitCash(int cash)  
 {  
      myBalance = myBalance – cash;  
      return myBalance;  
 }  
   
 public int creditCash(int cash)  
 {  
      myBalance = myBalance + cash;  
      return myBalance;  
 }  
   

I hope you guys are clear that why we use encapsulation.
Read more

Progress Bar Tutorial in Android


Progress Bar Tutorial in Android Application :


In this tutorial I am using my previous project (you can see the post here) in which I fetched the data from my blog using JSOUP library. In this project, I made a progress dialog till the network operation occur.

In progress dialog there is a dialog with the message and a spinner which revolves till the network operation or any background task.


During the data is fetched in the background, progress dialog is used to give the user a better interaction in the android application.

Create new project in Eclipse : File => New => Android Application Project and give any package name.

Code for activity_main.xml is same as previous tutorial and is shown below :
 <LinearLayout xmlns:android="http://schemas.android.com/apk/res/android"  
   xmlns:tools="http://schemas.android.com/tools"  
   android:layout_width="match_parent"  
   android:layout_height="match_parent"  
   android:orientation="vertical"  
   >  
   
   <LinearLayout   
     android:layout_width="wrap_content"  
     android:layout_height="wrap_content"  
     android:orientation="horizontal"  
     >  
   <TextView  
     android:layout_width="wrap_content"  
     android:layout_height="wrap_content"  
     android:text="TITLE :"   
     android:textSize="20sp"  
     android:textStyle="bold"  
     android:layout_marginLeft="15px"  
     android:layout_marginTop="10px"  
       
     />  
   <TextView  
     android:id="@+id/titleText"  
     android:layout_width="wrap_content"  
     android:layout_height="wrap_content"  
     android:textSize="18sp"  
     android:layout_marginLeft="15px"  
     android:layout_marginTop="10px"  
     />  
   
   </LinearLayout>  
     
     
   <TextView  
     android:layout_width="wrap_content"  
     android:layout_height="wrap_content"  
     android:text="POSTS TITLE :"   
     android:textSize="20sp"  
     android:textStyle="bold"  
     android:layout_marginLeft="15px"  
     android:layout_marginTop="10px"  
       
     />  
   <TextView  
     android:id="@+id/postsText"  
     android:layout_width="wrap_content"  
     android:layout_height="wrap_content"  
     android:textSize="15sp"  
     android:layout_marginLeft="15px"  
     android:layout_marginTop="10px"  
     />   
 </LinearLayout>  


This code is used to show the posts title and blog title in text views. You can refer my previous tutorial.

Now code for MainActivity.java is shown below :

 package com.javalanguageprogramming.jsoupdemo;  
   
 import org.jsoup.Jsoup;  
 import org.jsoup.nodes.Document;  
 import org.jsoup.select.Elements;  
   
 import android.app.Activity;  
 import android.app.ProgressDialog;  
 import android.os.Bundle;  
 import android.widget.TextView;  
   
   
 public class MainActivity extends Activity {  
   
      TextView titleText, postText;  
      String title, posts = "";  
      ProgressDialog progressDialog;  
        
      @Override  
      protected void onCreate(Bundle savedInstanceState) {  
           super.onCreate(savedInstanceState);  
           setContentView(R.layout.activity_main);  
             
           //initialize variables  
           titleText = (TextView)findViewById(R.id.titleText);  
           postText = (TextView)findViewById(R.id.postsText);  
             
           //start progress dialog at the start of network operation  
           progressBarInitialize();  
             
           //run on new thread because we cannot do network operation on main thread  
           new Thread(new Runnable() {  
                  
                @Override  
                public void run() {  
                     try{  
                                 
                     //get the Document object from the site. Enter the link of site you want to fetch  
                     Document document = Jsoup.connect("http://javalanguageprogramming.blogspot.in/").get();  
                       
                     //Get the title of blog using title tag  
                     title = document.select("h1.title").text().toString();  
                     //set the title of text view  
                       
                       
                     //Get all the elements with h3 tag and has attribute a[href]  
                     Elements elements = document.select("div.post-outer").select("h3").select("a[href]");  
                     int length = elements.size();  
                       
                     for(int i=0; i<length; i++){  
                          //store each post heading in the string  
                          posts += elements.get(i).text() + "\n\n";  
                            
                     }  
                       
                     //Run this on ui thread because another thread cannot touch the views of main thread  
                     runOnUiThread(new Runnable() {  
                            
                          @Override  
                          public void run() {  
                                 
                               //set both the text views  
                               titleText.setText(title);  
                               postText.setText(posts);  
                                 
                               //first check if the progress Dialog is already showing than dismiss it  
                               if(progressDialog.isShowing())  
                                    progressDialog.dismiss();  
                          }  
                     });  


                }catch(Exception e){  
                     e.printStackTrace();  
                     //if any exception occurs than progress Dialog should be removed  
                     if(progressDialog.isShowing())  
                          progressDialog.dismiss();  
                }  
                }  
           }).start();  
             
             
 }  
        
      private void progressBarInitialize(){  
           //initialize the progress dialog during the start of network operation  
                     progressDialog = ProgressDialog.show(MainActivity.this, "Loading...", "Fetching the data");  
                     //set the progress dialog to indeterminate state  
                     progressDialog.setIndeterminate(true);  
                     //make the progress dialog not cancellable so that user cannot cancel the network operation  
                     //or you can set it cancellable but for that you need to set the cancel mechanism for the network operation  
                     progressDialog.setCancelable(false);  
                       
      }  
 }  


In above activity I used show function of ProgressDialog object and through parameters the message and sub message is passed to show it on the Activity. I initialize the progress dialog when the network operation is started and cancel it when network operation finished.
Do not forget to give the uses permission : Internet for the network operation in this application.
Read more

Tuesday, 2 September 2014

Fetch Data From A Website Using JSOUP in Android Application


How to fetch data from a website using JSOUP in Android Application :


JSOUP is a Java library for fetching the static html pages of a website. It has some limitations in the dynamic websites but it can fetch data from different websites quite easily and quickly than other tools.
You can fetch the whole page html content of any website through this library. Further information you can get from their site : JSOUP

I strongly recommend you to use this library for fetching the data from a website in your android application.

I will show you working example of JSOUP library in your android application :


In the above screenshot, I fetched the title of my blog and all the blog posts title which are present on the first page through the use of JSOUP library.

All you do is to right click on the site you want to fetch the data and go to view page source and than search for the content in the page source you want to use in your android application.


In my case it is the h1 tag for fetching the title of my blog and h3 tag for fetching the title of each post that’s all I wanted to show in an example like you saw above.


Try to use the tag you want to fetch in the selector statement of JSOUP which is very powerful or else try to start with its parent. In my application I can fetch the title of my blog directly with the h1 tag but for h3 tag I used its parent div tag for fetching.

Now lets start with the example. Create a new Project in Eclipse : File => New => Android Application Project and name it you want and give it a package as com.javalanguageprogramming.jsoupdemo.

Start your project by copying the JSOUP library file in your libs folder . The library file of JSOUP is here : JSOUP Library

Code of activity_main.xml is shown below :

 <LinearLayout xmlns:android="http://schemas.android.com/apk/res/android"  
   xmlns:tools="http://schemas.android.com/tools"  
   android:layout_width="match_parent"  
   android:layout_height="match_parent"  
   android:orientation="vertical"  
   >  
   
   <LinearLayout   
     android:layout_width="wrap_content"  
     android:layout_height="wrap_content"  
     android:orientation="horizontal"  
     >  
   <TextView  
     android:layout_width="wrap_content"  
     android:layout_height="wrap_content"  
     android:text="TITLE :"   
     android:textSize="20sp"  
     android:textStyle="bold"  
     android:layout_marginLeft="15px"  
     android:layout_marginTop="10px"  
       
     />  
   <TextView  
     android:id="@+id/titleText"  
     android:layout_width="wrap_content"  
     android:layout_height="wrap_content"  
     android:textSize="18sp"  
     android:layout_marginLeft="15px"  
     android:layout_marginTop="10px"  
     />  
   
   </LinearLayout>  
     
     
   <TextView  
     android:layout_width="wrap_content"  
     android:layout_height="wrap_content"  
     android:text="POSTS TITLE :"   
     android:textSize="20sp"  
     android:textStyle="bold"  
     android:layout_marginLeft="15px"  
     android:layout_marginTop="10px"  
       
     />  
   <TextView  
     android:id="@+id/postsText"  
     android:layout_width="wrap_content"  
     android:layout_height="wrap_content"  
     android:textSize="15sp"  
     android:layout_marginLeft="15px"  
     android:layout_marginTop="10px"  
     />   
 </LinearLayout>  


In this code we are making four text views two text views we directly used for headings and the other two are used when through the use of JSOUP we get the data from my blog. So, I gave them Id’s for binding with my MainActivity.java.

Code for MainActivity.java is shown below :

 package com.javalanguageprogramming.jsoupdemo;  
   
 import org.jsoup.Jsoup;  
 import org.jsoup.nodes.Document;  
 import org.jsoup.select.Elements;  
   
 import android.app.Activity;  
 import android.os.Bundle;  
 import android.widget.TextView;  
   
   
 public class MainActivity extends Activity {  
   
      TextView titleText, postText;  
      String title, posts = "";  
      @Override  
      protected void onCreate(Bundle savedInstanceState) {  
           super.onCreate(savedInstanceState);  
           setContentView(R.layout.activity_main);  
             
           //initialize variables  
           titleText = (TextView)findViewById(R.id.titleText);  
           postText = (TextView)findViewById(R.id.postsText);  
             
             
           //run on new thread because we cannot do network operation on main thread  
           new Thread(new Runnable() {  
                  
                @Override  
                public void run() {  
                     try{  
                            
                     //get the Document object from the site. Enter the link of site you want to fetch  
                     Document document = Jsoup.connect("http://javalanguageprogramming.blogspot.in/").get();  
                       
                     //Get the title of blog using title tag  
                     title = document.select("h1.title").text().toString();  
                     //set the title of text view  
                       
                       
                     //Get all the elements with h3 tag and has attribute a[href]  
                     Elements elements = document.select("div.post-outer").select("h3").select("a[href]");  
                     int length = elements.size();  
                       
                     for(int i=0; i<length; i++){  
                          //store each post heading in the string  
                          posts += elements.get(i).text() + "\n\n";  
                            
                     }  
                       
                     //Run this on ui thread because another thread cannot touch the views of main thread  
                     runOnUiThread(new Runnable() {  
                            
                          @Override  
                          public void run() {  
                                 
                               //set both the text views  
                               titleText.setText(title);  
                               postText.setText(posts);  
                          }  
                     });  
                       
                }catch(Exception e){  
                     e.printStackTrace();  
                }  
                }  
           }).start();  
             
             
 }  
 }  


I made comments where I fetched the data from the website in MainActivity.java. You can also refer to JSOUP site if you want to fetch other types of tags.

Do not forget to add uses-permission : Internet because this application must use internet for fetching data from websites.

The AndroidManifest file is shown below :

 <?xml version="1.0" encoding="utf-8"?>  
 <manifest xmlns:android="http://schemas.android.com/apk/res/android"  
   package="com.javalanguageprogramming.jsoupdemo"  
   android:versionCode="1"  
   android:versionName="1.0" >  
   
   <uses-sdk  
     android:minSdkVersion="8"  
     android:targetSdkVersion="19" />  
   <uses-permission android:name="android.permission.INTERNET" />  
   
   
   <application  
     android:allowBackup="true"  
     android:icon="@drawable/ic_launcher"  
     android:label="@string/app_name"  
     android:theme="@style/AppTheme" >  
     <activity  
       android:name="com.javalanguageprogramming.jsoupdemo.MainActivity"  
       android:label="@string/app_name" >  
       <intent-filter>  
         <action android:name="android.intent.action.MAIN" />  
   
         <category android:name="android.intent.category.LAUNCHER" />  
       </intent-filter>  
     </activity>  
   </application>  
   
 </manifest>  
   

Note : It takes 3-4 sec to fetch and show the data to your application, at that time you can use progress dialog.
Read more